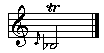
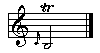
Home > Fingering Charts > Saxophone > Trill > First Octave

Trill Fingering Chart for Saxophone

First Octave: A3 to C#5

This fingering chart includes trill fingerings, which are fingerings designed for rapid alternation between two notes at an interval of a minor second (semitone) or a major second (whole tone) apart. Many of these fingerings can also be used as alternate fingerings for some fast passages. Keys to be trilled are indicated in red. When more than one key is to be trilled, the keys should be simultaneously pressed and simultaneously released, unless the description says to alternate pressing and releasing the keys. These fingerings are the same on all sizes of saxophone (soprano, alto, tenor, baritone, and bass) unless specified otherwise.


Trill

Written

Fingering

Description

Src.

A3–B3

A0-Bb0 A 123Bb|123C Trill the low A key. For models with a low A key.  

A3–B3

A0-B0 A 123B|123C Trill the low A key. For models with a low A key.  

A3–B3
B3–C4

A#0-B0 123B Bb|123C Impractical.  
123Bb|123C Finger A#3. Extend RH 2 across bell stack to hold low B closed, pressing directly on the pad cup arm with the top of RH 2. Hold the E/F# key closed with middle knuckle of RH 2. Trill the low Bb key with LH little finger.  CB

A3–B3
B3–C4

Bb0-C1 123Bb|123C    

B3–C4

B0-C1 123B|123C    

B3–C4
C4–D4

B0-C#1 123C# B|123C Impractical.  

B3–C4
C4–D4

C1-Db1 123C#|123C    

C4–D4

C1-D1 123|123C    

C4–D4

C#1-D1 123C#|123C    

C4–D4
D4–E4

C#1-D#1 123C#|123Eb C Impractical.  

D4–E4

D1-Eb1 123|123Eb    

D4–E4

D1-E1 123|123    

D4–E4
E4–F4

D#1-E1 123|123Eb    

D4–E4
E4–F4

Eb1-F1 123|123Eb    

E4–F4

E1-F1 123|12    

E4–F4
F4–G4

E1-F#1 123|12–    

E4–F4
F4–G4

F1-Gb1 123|1–F#    

F4–G4

F1-G1 123|1––    

F4–G4

F#1-G1 123|–2    

F4–G4
G4–A4

F#1-G#1 123G#|–2    

G4–A4

G1-Ab1 123G#|–––    
123C#|–––    
123B|–––    
123Bb|–––    
123|–––B Trill low B cup pad on bell with RH 3. For curved models, rather than straight models like most sopranos. JS

G4–A4

G1-A1 123|–––    

G4–A4

G#1-A1 123G#|–––    

G4–A4
A4–B4

Ab1-Bb1 123G#|Bb–––    
1Bb23G#|–––    

A4–B4

A1-Bb1 12–|Bb–––    
1Bb2–|–––    

A4–B4

A1-B1 12–|–––    

A4–B4
B4–C5

A#1-B1 12–|Bb–––    
1––|1––    
1––|–2    

A4–B4
B4–C5

Bb1-C2 12–|Bb–––    
1Bb––|C–––    

B4–C5

B1-C2 1––|C–––    

B4–C5
C5–D5

B1-C#2 1––|–––    

B4–C5
C5–D5

C2-Db2 2–|–––    

C5–D5

C2-D2 Eb–2–|–––    
T 123|123C    

C5–D5

C#2-D2 D–––|–––    
T 123|123   HR

C5–D5
D5–E5

C#2-D#2 –––|E–––    
T 123|123Eb   MF
Continue to Second Octave >>


Jump to the First or Second Octave or Altissimo Register
Back to Saxophone Fingering Charts
Back to
Home
Copyright © 1998–2005
by Timothy Reichard
   visits since 8/03